
Scraps and pieces of the creativity in my life
Monday, December 3, 2012
Clearly The Best: Re-vamping with Overstamping (S01E12)
Let this video show you how to get more use out of your stamps.
Experimenting with Pop-up cards
Drats! I've gone and done it again! I am so ashamed and apologize to those who may be following me. You sure haven't had much to follow lately. I have been busy and haven't even had the time to craft like I would like to. And then what I have made I haven't posted. I am going to start my resolutions early and resolve to make posting a higher priority.
With that said, my card ladies have been wanting to do a pop-up card and here's what we did this last month for class. I will have to say that I was definitely winging this one. But I am pleased with the results. Making a decision as to how many pop-outs you want and the depth and height of them is the first decision. I recommend you Google pop up cards and get some ideas from out in Google land, because there are so many ways you can do them.
On this card I made 3 pop-outs. The two outside ones stand out 3/4" and the inside only 1/2".
I used a lot of cuts from the Art Philosophy and Artiste Cricut cartridges. We did alot of piecing. The turkey was cut 3 times with different papers each time. One was a shadow layer and then the actual body and head part I just cut off the wings. The middle layer I used Close To My Heart Clementine paper. I really like the dimensional effect. The pumpkin I cut 5 ovals and then layered them. It didn't look so much like a pumpkin until I put the leaves and vines on. All the leaves were cut on plain cardstock and them stamped and ink distressed get the texture. I used a Close To My Heart stamp for this technique. Stamp set B1355 Timeless, which I believe is retired now.
On the outside, the background paper is from the retired pack Passages. I used the over stamping technique with the leaves and acorn and used the same stamp set as listed above. I will post a video showing how to do this technique next.
Thanksgiving was cut from the Artiste cartridge and "celebrate" is from the Say It In Style stamp set D1283.
 And here is a look at the inside.

The sentiment on the inside is from A Little Thanks D1444.
I am also going to use this for a challenge over on Word Art Wednesday a blog I just found.
Hope you enjoy. If you are interested in purchasing some of these products or don't know what Close To My Heart is all about, look to the right for the "shop with me" button.
Blessings, Polly
With that said, my card ladies have been wanting to do a pop-up card and here's what we did this last month for class. I will have to say that I was definitely winging this one. But I am pleased with the results. Making a decision as to how many pop-outs you want and the depth and height of them is the first decision. I recommend you Google pop up cards and get some ideas from out in Google land, because there are so many ways you can do them.
On this card I made 3 pop-outs. The two outside ones stand out 3/4" and the inside only 1/2".
I used a lot of cuts from the Art Philosophy and Artiste Cricut cartridges. We did alot of piecing. The turkey was cut 3 times with different papers each time. One was a shadow layer and then the actual body and head part I just cut off the wings. The middle layer I used Close To My Heart Clementine paper. I really like the dimensional effect. The pumpkin I cut 5 ovals and then layered them. It didn't look so much like a pumpkin until I put the leaves and vines on. All the leaves were cut on plain cardstock and them stamped and ink distressed get the texture. I used a Close To My Heart stamp for this technique. Stamp set B1355 Timeless, which I believe is retired now.
On the outside, the background paper is from the retired pack Passages. I used the over stamping technique with the leaves and acorn and used the same stamp set as listed above. I will post a video showing how to do this technique next.
Thanksgiving was cut from the Artiste cartridge and "celebrate" is from the Say It In Style stamp set D1283.


The sentiment on the inside is from A Little Thanks D1444.
Hope you enjoy. If you are interested in purchasing some of these products or don't know what Close To My Heart is all about, look to the right for the "shop with me" button.
Blessings, Polly
Friday, August 31, 2012
More paper flowers and a color challenge
This card sketch comes from Mojo Monday #256 and a color challenge from Heart 2 Heart challenges that I admit I had some trouble with. Just wasn't sure how to use Pear and Lagoon together. I used two of the wonderful papers from the Dotty For You paper pack and then the Lagoon flower is from the Stella paper pack. The sunset flowers are cut from the Art Philosophy Cricut cartridge white cardstock and my waterbrush. The Lagoon flower was cut from the newest Close To My Heart Artiste Cricut cartridge. I used the flower on pg 54 using Accent 3 and shift key. I cut several at different sizes and then added the stamens. The green chevron banner is stamped using our National Stamping Month special stamp set. "It's Your Day" This is a double stamp set and a super deal. Order $35 in product and get this set for $5 more!

Our color-ready seam binding that I spritzed with water and scrunched up and let dry like that and a stick pin from our Bling Assortment completed the flower cluster.
So here is my card


Blessings, Polly
Monday, August 27, 2012
Doggie card and Dakota paper
August brings the "dog days of summer" and so H2H's challenge was to make a card with a dog on it.The dog stamp is an older retired stamp and it reminded me of a little boy baby card, could be for a baby shower or a first birthday or some occasion like that. The new Dakota paper pack has some super papers for boys. And the new stamp set B1405 Rugged Dude has this cute little pocket stamp. I didn't have small gold brads for the pocket studs so I created my own by embossing some using gold embossing powder. I have been itching to use our new burlap ribbon and it goes perfectly with this card. I added some tiny black beads to his eyes to make them stand out a little and a small circle from a circle punch made his tag.
 Blessings, Polly

Sunday, August 26, 2012
Sympathy card using Avonlea paper and other new product
I love the colors in this paper pack, they are my comfort colors. I like that some of the papers look like they are textured.
Close To My Heart is always striving to stay on trend and they have added a feature in this new Idea Book that they haven't done before. They are offering some trendy colors to certain paper packs. The paper packs that offer these trendy colors are:
Avonlea with Avonlea Off-White, Avonlea Teal, and Avonlea Green
La Belle Vie with: La Belle Vie Mauve, and La Belle Vie Pink
Flirty with: Fliry Raspberry, and Flirty Yellow
Now what exactly does that mean? It means in each of the above paper packs there is cardstock included with those particular colors and you can only get those colors when you order one of those paper packs. The cardstock or inks won't be available any other way.
Why? That allows them to change some colors in each catalog to stay a little more trendy and yet, we won't have to be buying more cardstock and inks every little bit.
How's that going to work? These paper packs have enough of our regular colors that there will still be plenty of cardstock and ink choices in the color palette to choose from and then we will have some extra color choices in cardstock in the paper pack to play with. And if your not quite as versed in the color wheel and pulling in colors that could be added, Tresa Black has done that fabulously for us. Go here to see the PDF's that shes created to share. Thank you Tresa, your fabulous! This is exactly what I needed. I plan to do the Avonlea card kit as a class in September and some of the ladies expressed a concern about the cards not being very colorful. Now I have this reference sht to pull in some color. I love it. We will probably do at least one card of each of the three designs and then we'll probably do some of our own designing from there. Or they will expect me to do that :)
This card was designed for a friend who recently lost an Aunt, but it also goes with the H2H challenge Sympathy card for Aug, the first wk.
Besides the Avonlea paper pack here are the other new products I used:
the fancy swirly frame- cut from the Artiste Cricut cartridge! it's a must have and I will certainly be using and showing many more designs from this awesome cartridge.
Silver Shimmer Trim-its self adhesive!
Black and Grey Sparkles
 This flower isn't Close To My Heart and it wasn't created from one of the flowers on the Cricut cartridge. It was a preformed purchased one, but I colored it with my water brush and Juniper ink and then added some Glitz Glitter Gel in Stardust.
 A simple card, but very elegant and appropriate for a sympathy card.
Blessings, Polly
Close To My Heart is always striving to stay on trend and they have added a feature in this new Idea Book that they haven't done before. They are offering some trendy colors to certain paper packs. The paper packs that offer these trendy colors are:
Avonlea with Avonlea Off-White, Avonlea Teal, and Avonlea Green
La Belle Vie with: La Belle Vie Mauve, and La Belle Vie Pink
Flirty with: Fliry Raspberry, and Flirty Yellow
Now what exactly does that mean? It means in each of the above paper packs there is cardstock included with those particular colors and you can only get those colors when you order one of those paper packs. The cardstock or inks won't be available any other way.
Why? That allows them to change some colors in each catalog to stay a little more trendy and yet, we won't have to be buying more cardstock and inks every little bit.
How's that going to work? These paper packs have enough of our regular colors that there will still be plenty of cardstock and ink choices in the color palette to choose from and then we will have some extra color choices in cardstock in the paper pack to play with. And if your not quite as versed in the color wheel and pulling in colors that could be added, Tresa Black has done that fabulously for us. Go here to see the PDF's that shes created to share. Thank you Tresa, your fabulous! This is exactly what I needed. I plan to do the Avonlea card kit as a class in September and some of the ladies expressed a concern about the cards not being very colorful. Now I have this reference sht to pull in some color. I love it. We will probably do at least one card of each of the three designs and then we'll probably do some of our own designing from there. Or they will expect me to do that :)
This card was designed for a friend who recently lost an Aunt, but it also goes with the H2H challenge Sympathy card for Aug, the first wk.
Besides the Avonlea paper pack here are the other new products I used:
the fancy swirly frame- cut from the Artiste Cricut cartridge! it's a must have and I will certainly be using and showing many more designs from this awesome cartridge.
Silver Shimmer Trim-its self adhesive!
Black and Grey Sparkles


Blessings, Polly
Thursday, August 16, 2012
Double stamp set for Aug/Sept Constant Campaign
September is National Stamping month and Close To My Heart wants to get the party started early! So as of Aug. 15, yesterday through September 30 you can order a double stamp set called, "It's Your Day". This is a retail value of $35.90, but you can have this stamp set by purchasing $35 in product from CTMH and then for $5 more get this double stamp set. This baby is loaded with so many stamps that are trendy now and could be used for so many projects. Mini albums such as, All About You or Family, scrapbook pages of all kinds, and even cards. I will be showing some artwork in future posts.
Here is what you get.
 Don't miss out on this special deal.
Blessings, Polly
Here is what you get.

Blessings, Polly
Dress card
For this month's card group I switched things up a bit. Normally I decide on a card and I prepare all the kits and then they put them together like my sample- with some variations. I have been wanting to make a card using this dress template found here. So I thought it would be fun to put out several paper packs and let the ladies decide on which they wanted to use and create their own look. I encouraged them to use my scraps if possible. I made 3 samples to get their creative juices flowing. It was very interesting, a huge success, and I had a large mess to clean up afterward, what with all the paper packs, embellishments, stamp sets, etc! My only regret- that I didn't take pictures of each one.
Here is my favorite for more than one reason. I love this new paper pack-La Belle Vie, and I just love how this all came together, very vintagey ( if that's a word.) I used the weekly sketch challenge over on the Paper Craft Planet.

 This one I used some of the yummy Dotty For You paper
 and then an older paper pack, but I love how it turned out
 these are so fun and I can think of more that I'd like to try. Hope this stirs up your creative juices to go "create"!
If your wondering where to find some of this wonderful paper which is heavy cardstock and double sided. Look to the right for a Shop With Me button and check out what we have. All new paper packs just came out this month!
Blessings, Polly
Here is my favorite for more than one reason. I love this new paper pack-La Belle Vie, and I just love how this all came together, very vintagey ( if that's a word.) I used the weekly sketch challenge over on the Paper Craft Planet.

And a look on the inside


If your wondering where to find some of this wonderful paper which is heavy cardstock and double sided. Look to the right for a Shop With Me button and check out what we have. All new paper packs just came out this month!
Blessings, Polly
Wednesday, August 8, 2012
The Little Princesses are 1!!!
It's so hard to believe that one year ago today we were anxiously waiting to hear from our son and his wife what our two latest grandchildren were. They were expecting twins and hadn't found out before whether we had boys, girls, or one of each. Most thought that since we had so many boys in the family we'd probably have at least one boy. Most of us were hoping to be blessed with one boy and one girl. Though we were mostly just anxious to meet them and wanted them to be happy and healthy.
What a surprise when we heard that we were blessed with two healthy girls!!
They have been such good, happy, healthy little girls. We are sad that we don't get to see them more often, but modern technology sure helps to make distance seem not quite so far. Kate, (their mother) is so good about sending pictures frequently on my phone, we've been up there 3 times since they were born, and now that my husband has an iPhone I hope to do Facetime. Maybe we can "kinda" be there at their party. So here they are
 And here is the cards I made for them. Cards will have to do for now and the gifts will come later.

 I hope we don't have to wait to long to see them again. They grow and change so fast at this age.
Thanks for stopping by, Polly
What a surprise when we heard that we were blessed with two healthy girls!!
They have been such good, happy, healthy little girls. We are sad that we don't get to see them more often, but modern technology sure helps to make distance seem not quite so far. Kate, (their mother) is so good about sending pictures frequently on my phone, we've been up there 3 times since they were born, and now that my husband has an iPhone I hope to do Facetime. Maybe we can "kinda" be there at their party. So here they are


Thanks for stopping by, Polly
Birthday card
The end of July and throughout August brings a lot of birthdays in
our family. And as usual I am running behind in getting them made and
sent out. My family knows me and I don't think they're surprised. We
were in IN in June and I got the grandsons done and given out then, we
kinda had a big birthday party for all then.
This card is for our daughter. She's a very special person in my life and I miss her so. I wish I could help her more and just spend more time together shopping, crafting, and whatever else we find to do together.
So I used the Roxie paper pack (no longer available) and some new products from our latest catalog.
I love the vintage/French flair of these new stamp sets: Bonjour B1414 and Jardin D1528.
I stamped using our new Slate ink the script/flower stamp on the canvas looking paper from Roxie and then overstamped the Bonjour in Smoothie. This is the background of the inside of the frame. I stamped the frame on Colonial White cardstock in black and then painted on a gold shimmer over it. I wanted an old looking gold/black frame. I fussy cut the frame inside and out and then popped it up.
The peachy looking flowers were cut using the Art Philosophy Cricut cartridge and then rolled. The pink flower was created with the same cartridge, but it was cut separately in layers. I waterbrushed on the pink and then stamped over that with the script part of the stamp mentioned above in Slate ink. I misted the petals with water and using a stylus I crumpled and added texture to each layer. After they were dry, I then glued each layer, staggering the petals and added a grey pearl in the center. I then painted some gold shimmer over it all. The leaves were cut from Juniper cardstock and the same Cricut cartridge and I added some texture using the stylus and then ink distressed using Chocolate ink. The grey satin polka dot is another new product.
I really like how this turned out.


 The last photo you can see the gold shimmer I painted on. I like this subtle shimmer so much. And a photo doesn't do it justice.
Have a blessed day, Polly
This card is for our daughter. She's a very special person in my life and I miss her so. I wish I could help her more and just spend more time together shopping, crafting, and whatever else we find to do together.
So I used the Roxie paper pack (no longer available) and some new products from our latest catalog.
I love the vintage/French flair of these new stamp sets: Bonjour B1414 and Jardin D1528.
I stamped using our new Slate ink the script/flower stamp on the canvas looking paper from Roxie and then overstamped the Bonjour in Smoothie. This is the background of the inside of the frame. I stamped the frame on Colonial White cardstock in black and then painted on a gold shimmer over it. I wanted an old looking gold/black frame. I fussy cut the frame inside and out and then popped it up.
The peachy looking flowers were cut using the Art Philosophy Cricut cartridge and then rolled. The pink flower was created with the same cartridge, but it was cut separately in layers. I waterbrushed on the pink and then stamped over that with the script part of the stamp mentioned above in Slate ink. I misted the petals with water and using a stylus I crumpled and added texture to each layer. After they were dry, I then glued each layer, staggering the petals and added a grey pearl in the center. I then painted some gold shimmer over it all. The leaves were cut from Juniper cardstock and the same Cricut cartridge and I added some texture using the stylus and then ink distressed using Chocolate ink. The grey satin polka dot is another new product.
I really like how this turned out.

Here are a couple of close ups


Have a blessed day, Polly
Sunday, July 29, 2012
Playing with ink distress technique
I have been wanting to play around with the ink distress technique that you see Tim Holtz and others doing. I wanted to see if I could get this effect using Close To My Heart products. So here is my rendition.
I dropped a drop of Crystal Blue reinker on a sheet of wax paper and then a drop of Sky reinker next to the first drop. Next I spritzed over the drops with some water. I took a paintbrush and mixed the colors some, but left some areas with the original colors. I had previously used this same piece of wax paper to apply some gold Pearl Ex mica powder (not a CTMH product) to some other project and I had put these drops of reinker right over the remaining Pearl Ex. So when I spritzed on the water it reactivated the Pearl Ex too. I then took a piece of Colonial White cardstock and drug it through the mixed reinkers until I had the piece covered in ink. I then let my piece air dry, only because I had to go attend some other chore that was calling me (bum). It could be dried with our craft heater if you were wanting to use the piece immediately.
I was really pleased with the color mix and the gold mica powder added a super touch, I thought. I then cut the circle shape and stamped the bird image.
The patterned papers I used are an older retired CTMH paper pack-Life Delights, but I thought the colors worked well together.
My card sketch came from Mojo Monday challenge #251.
 Here is a close-up of just the circle part to show the ink distress technique a little better.
 I even decorated the inside. I used the June stamp of the month - Life Is Tweet-and it worked beautifully to use part of the sentiment on the outside and the rest inside.
 I will definitely be messing with this ink distress technique in the near future, mixing different colors and not just using monochromatic colors.
Hope you enjoy. Blessings, Polly
I dropped a drop of Crystal Blue reinker on a sheet of wax paper and then a drop of Sky reinker next to the first drop. Next I spritzed over the drops with some water. I took a paintbrush and mixed the colors some, but left some areas with the original colors. I had previously used this same piece of wax paper to apply some gold Pearl Ex mica powder (not a CTMH product) to some other project and I had put these drops of reinker right over the remaining Pearl Ex. So when I spritzed on the water it reactivated the Pearl Ex too. I then took a piece of Colonial White cardstock and drug it through the mixed reinkers until I had the piece covered in ink. I then let my piece air dry, only because I had to go attend some other chore that was calling me (bum). It could be dried with our craft heater if you were wanting to use the piece immediately.
I was really pleased with the color mix and the gold mica powder added a super touch, I thought. I then cut the circle shape and stamped the bird image.
The patterned papers I used are an older retired CTMH paper pack-Life Delights, but I thought the colors worked well together.
My card sketch came from Mojo Monday challenge #251.


Hope you enjoy. Blessings, Polly
Thursday, July 26, 2012
Starlets layout
Here is one of the layouts I did for an entry in the Close To My Heart Convention album contest this month. This was a fun LO to do. Everything on these two pages is product from CTMH. I will just list some of the main products used.
Lucy paper pack
Dotty For You paper pack
Art Philosophy Cricut cartridge: the paper flowers, the title letters and the L & H, a couple of the butterfly shapes
Lucy Complements Glittery Rub-ons: the crown, some of the flowers
Having scrapbooked for our three sons and 5 grandsons, its a ton of fun to have a couple little princesses to scrapbook now! The picture of them in their pink and zebra vests are their one yr pictures. And the others are pics that were taken just a few weeks earlier when we were up there visiting. Yes, they live over 1,000 miles away from us.That's sad, but we sure love every minute that we get to spend with them when we're there. Modern technology makes it a little easier to not feel so far away and keep up on their progress. I hope soon to be able to Skype and then we can really feel like we are seeing them more often.
So here is page one and I am putting in this first page in pagemaps embellishments sketch contest.


 Have a blessed day, Polly
Lucy paper pack
Dotty For You paper pack
Art Philosophy Cricut cartridge: the paper flowers, the title letters and the L & H, a couple of the butterfly shapes
Lucy Complements Glittery Rub-ons: the crown, some of the flowers
Having scrapbooked for our three sons and 5 grandsons, its a ton of fun to have a couple little princesses to scrapbook now! The picture of them in their pink and zebra vests are their one yr pictures. And the others are pics that were taken just a few weeks earlier when we were up there visiting. Yes, they live over 1,000 miles away from us.That's sad, but we sure love every minute that we get to spend with them when we're there. Modern technology makes it a little easier to not feel so far away and keep up on their progress. I hope soon to be able to Skype and then we can really feel like we are seeing them more often.
So here is page one and I am putting in this first page in pagemaps embellishments sketch contest.

Sorry the lighting wasn't very good. Here is the second page of the LO

And here a couple of close-ups to show the details a little better. These really are much prettier and brighter in life.


Clean and Simple Wedding card
I have seen a lot of monochromatic cards especially in white and cream lately on Pinterest. They are so elegant and classy looking. Just right for wedding and anniversary cards. So this was the card we made in my monthly card class this month. I am entering this in the Stampin' Sisters in Christ Challenge #149. Their challenge happens to be a C.A.S, (clean and simple) card and in the Sweet Stampin' Challenge monochromatic challenge. I will have to say that it was very difficult for me not to ink distress. And as you can see, I didn't quite get it pulled off. LOL I ink distressed very lightly the sentiment label. I thought it added just the right amount of pop. I used the Timeless embossing folder from Cuddlebug, a 5 x 7 size. The label and the flower were cut from shapes on the Art Philosopy Cricut cartridge. The flower is actually a couple layers of different sizes of a snowflake and a couple of layers of one of the flower shapes on that cartridge. I misted each layer with water and crumpled it up. Unfolded them somewhat and took a stylus and with each individual layer laid on a mousepad, I ran the stylus around the center to make the flower cup up. And then I let them dry. Glued each layer together one on top of the other, making sure to stagger the petals. I then added some Glitter Glitz around in various places. A clear sparkle in the center finished the flower. It was so hard not to do some ink distressing on those petals. I created a border using a Fiskars border punch and some sheer cream ribbon. A Rhinestone Designer Brad in the center of the ribbon bow was the finishing touch.

 Close To My Heart products used:
Cardstock: Colonial White and Black
Ink: Black
Art Philosophy Cricut Cartridge
Glitz Glitter Gel-Stardust
Clear Sparkles
Rhinestone Designer Brad
D1192 Now and Forever stamp set (retired) for the sentiment
you can find these products when you click on the "shop with me" button over on the right
Thanks for stopping by, Polly

Sorry the lighting wasn't real great. Doesn't do the card justice. Here is a closer view of the flower.

Cardstock: Colonial White and Black
Ink: Black
Art Philosophy Cricut Cartridge
Glitz Glitter Gel-Stardust
Clear Sparkles
Rhinestone Designer Brad
D1192 Now and Forever stamp set (retired) for the sentiment
you can find these products when you click on the "shop with me" button over on the right
Thanks for stopping by, Polly
Sunday, July 22, 2012
New Idea book is here!!!
The new Autumn/Winter 2012 catalogs are here! And you can purchase this catalog from me in just a few days!

This 144 pg. catalog is packed with incredible projects, papers, stamps and more! Now, I have a confession to make- generally the Autumn/Winter catalog is not my favorite. I know, for lots of you, its your favorite. But I am delighted, excited, and super thrilled to say that I think this is my favorite catalog ever!! And I have been a consultant for 4 yrs and was ordering from CTMH before that. I LOVE,love,love this catalog. I like/love all the paper packs and I like that they have added Home Decor projects, and of course, as I mentioned before the new Cricut cart "Artiste". These cartridges from CTMH are over the top.
One year ago they introduced the "Art Philosophy" cartridge and I have been using that baby for a year and still haven't used all the images and done all the things that I could do with it. And now we have another that promises to be just as useful and fun if not more so!
Besides this new cartridge here are some of the other features in this book
You can get this catalog from me in one of several ways. Host a Gathering and I will give you the catalog, place an order on my website at pollylewis.ctmh.com and I will send you a free catalog or sign up for my scrapbook club and get a free catalog. You can contact me: scrapinmolly@yahoo.com if you have any questions.
Blessings to you all, Polly
This 144 pg. catalog is packed with incredible projects, papers, stamps and more! Now, I have a confession to make- generally the Autumn/Winter catalog is not my favorite. I know, for lots of you, its your favorite. But I am delighted, excited, and super thrilled to say that I think this is my favorite catalog ever!! And I have been a consultant for 4 yrs and was ordering from CTMH before that. I LOVE,love,love this catalog. I like/love all the paper packs and I like that they have added Home Decor projects, and of course, as I mentioned before the new Cricut cart "Artiste". These cartridges from CTMH are over the top.
One year ago they introduced the "Art Philosophy" cartridge and I have been using that baby for a year and still haven't used all the images and done all the things that I could do with it. And now we have another that promises to be just as useful and fun if not more so!
Besides this new cartridge here are some of the other features in this book
- Studio J Express Collection
- Elimination of Studio J memberships. Now only $6.95 per layout for EVERYONE!
- New Organizers
- New Alcohol Markers! Sold in pairs of coordinating colors.
- 62 New Stamp Sets!
- 53 New accessories!
- 13 Workshops-on-the-Go, including 2 home decor projects!
- 6 new colors, 26 retiring colors. So yes, a smaller, more stream-lined color palette.
- New How-to Book
- All cardstock colors available in bulk quantities again!
You can get this catalog from me in one of several ways. Host a Gathering and I will give you the catalog, place an order on my website at pollylewis.ctmh.com and I will send you a free catalog or sign up for my scrapbook club and get a free catalog. You can contact me: scrapinmolly@yahoo.com if you have any questions.
Blessings to you all, Polly
CTMH convention 2012 Dallas Texas
Once again, I have badly neglected this blog. I was so busy right before the convention getting my album contest pages and roomie gifts done. Plus all the stuff that needs to be done before you take off and leave only men and boys in the house for a few days.
It didn't help that I waited til the last minute to decide to do pages for the Album contest. I had been mulling it around in my head for several months, but wasn't completely committed until the last minute. And last minute it was. I actually put some finishing touches on after I arrived at the hotel on Wed. I also, had a wonderful idea for roomie gifts, but could not find the main item that I needed, so I had to come up with plan B at the last minute and by then it couldn't be anything that took much time. I will continue to search for the needed item and maybe I will already have next yrs roomie gift idea planned.
Convention was a fun filled learning experience. I am filled to the brim with crafting ideas and business ideas. I am excited that CTMH has moved into some Home Decor ideas, but they have by no means left the cardmaking and scrapbooking.
In fact, they now have 13 Workshops on the Go. 8 are for each of the featured paper packs, 2 are complete cardmaking kits (which each include an exclusive C-sized stamp set) and 1 is a gorgeous Home Decor project and 1 a Halloween party theme using our new Cricut cartridge "Artiste"!
 Like our previous Cricut cart "Art Philosophy", this cartridge is loaded. 700 images: titles, 3-D images, cards and envelopes, cupcakes liners, and pinwheels. Tons of party/holiday themed items. And it is going to be even easier to use. For example, if you want to cut a card and you want it to be a finished 6" card, set the dial at 6" and it will cut the card so that it will be a finished 6" card and the same with the coordinating envelope, leave the dial at the same measurement and envelope will cut for card to fit in. Also, a booklet comes with the cartridge to show you how to fold all the 3-D boxes, bags, purses and such. Each key on the cartridge has its own theme and certain things have a "ideal cut size" marked on its image so that you can get a nice cut.
You can order this incredible cartridge come Aug 1 from me by going to pollylewis.ctmh.com. You can purchase this item straight out for $99. You not only get this cartridge with 700 images, but 3 coordinating D-sized stamp sets and 3 shts of Dimensional Chipboard Elements that coordinate with cuts from the cartridge. One of the shts is pages for a mini album! You can cut the matching pages out of our beautiful paper and it even cuts the holes for the binding!
You can also get this cartridge for half price when you sign up to be a Hostess for a Gathering and your sales reach $250.
Maybe you are interested in having a Gathering, but you live to far away, get in contact with me and we can set up an EZ Invite. You can do a book party and the orders can be sent to each individual.
I will end this post here, but continue to check back as I plan to add several more in the next few days. Including my Album contest pages.
Blessings to you all, Polly
It didn't help that I waited til the last minute to decide to do pages for the Album contest. I had been mulling it around in my head for several months, but wasn't completely committed until the last minute. And last minute it was. I actually put some finishing touches on after I arrived at the hotel on Wed. I also, had a wonderful idea for roomie gifts, but could not find the main item that I needed, so I had to come up with plan B at the last minute and by then it couldn't be anything that took much time. I will continue to search for the needed item and maybe I will already have next yrs roomie gift idea planned.
Convention was a fun filled learning experience. I am filled to the brim with crafting ideas and business ideas. I am excited that CTMH has moved into some Home Decor ideas, but they have by no means left the cardmaking and scrapbooking.
In fact, they now have 13 Workshops on the Go. 8 are for each of the featured paper packs, 2 are complete cardmaking kits (which each include an exclusive C-sized stamp set) and 1 is a gorgeous Home Decor project and 1 a Halloween party theme using our new Cricut cartridge "Artiste"!

You can order this incredible cartridge come Aug 1 from me by going to pollylewis.ctmh.com. You can purchase this item straight out for $99. You not only get this cartridge with 700 images, but 3 coordinating D-sized stamp sets and 3 shts of Dimensional Chipboard Elements that coordinate with cuts from the cartridge. One of the shts is pages for a mini album! You can cut the matching pages out of our beautiful paper and it even cuts the holes for the binding!
You can also get this cartridge for half price when you sign up to be a Hostess for a Gathering and your sales reach $250.
Maybe you are interested in having a Gathering, but you live to far away, get in contact with me and we can set up an EZ Invite. You can do a book party and the orders can be sent to each individual.
I will end this post here, but continue to check back as I plan to add several more in the next few days. Including my Album contest pages.
Blessings to you all, Polly
Sunday, May 20, 2012
Footloose- at the Beach
For our May scrapbook class we did the LOs on page 39 and pg 42. Both of these pages have lots of details and were alot of fun to put together. The LO on page 42 I altered to suit the photo that I had and this is what I ended up with.

and then I had more pictures that went with our day at Cocoa Beach so I created this LO using Frosted Designs Sketch Along Tuesday #41for the second page of this 2 page LO. Here is the sketch outline.
 and because I wanted this to be the right page of a two page LO, I flip flopped the orientation of the elements on the page.
 I will post the other 2 page LO later this week.
Enjoy! Polly


Enjoy! Polly
This week its Dotty and Stripes over at H2H
How about trying some dots and stripes together? Close To My Heart has a super fun paper pack for National Scrapbook Month. 24 sheets of fun summer colors with lots of hot designs- chevrons, stripes, butterflies, large circles, labels, plus on the other side of each of these designs are dots! In coordinating colors! There's two shts of 12 designs. Lots of paper for lots of projects. Know what else is cool? Order $35 in product from CTMH and you get all this paper for just $5 more! This is cardstock weight paper. But you better hurry, cause we are very near the end of the month already and its available until supplies are gone. So, go on over to the shop button on the right and order some of this delicious paper.
This week Heart 2 Heart challenges us with dots and stripes, imagine that! So here is something I made using these papers.
 The dots are on the backside of one of the sheets and the stripe is another design. I cut the tags from one of the sheets of paper and it looks like this.
 What a lot of fun just on that sheet.
Hope you enjoy! Polly
This week Heart 2 Heart challenges us with dots and stripes, imagine that! So here is something I made using these papers.


Hope you enjoy! Polly
Tuesday, May 15, 2012
Sewing class-second project: Peasant dress
For our second project in the sewing class I'm teaching one of the girls found a really cute peasant dress that Zulily had advertised. So I went looking for a pattern online. I found one for 3 & 5 yr olds here. A really fun and simple dress and so many things you can do to change it up. I should have taken pictures of all the girls creations. They each chose the fabrics that they wanted to use. Here is the one I made and I adjusted it to be smaller so that it would fit one of my beautiful granddaughters. I have another to make and it will be in coordinating fabrics.
 I am hoping it will fit these little princesses.
 I will post the other dress when I can get it finished.
Thanks for stopping by. Polly


Thanks for stopping by. Polly
Wednesday, May 9, 2012
Another Mothers Day card
I got the inspiration for this card on Pinterest. I spend so much time on there and I can't decide if its a big waste of time or if I learn and see enough inspiration on there to validate spending as much time on there as I do. There is a ton of inspiration and so much information on so many different things!
I admit it, I'm addicted, but I have gone for days without looking too.
Anyway, back to this card-it was posted on stampinconnection.com which is a Stampin Up demonstrators community. And since I'm not a Stampin Up Demonstrator I can't log in and give credit where credit is due. So I copied it the best I could using Close To My Heart products.
Pemberly paper pack.
Stamp sets: the sentiment Simple Beauty D1261 (retired)
Rosy Regards DB1369
Card Word Puzzle C1494
I created the roses by first embossing on white cardstock the rose from Card Word Puzzle. I used Silver Pearl Z678 embossing powder (no longer available through Close To My Heart, but it's a Ranger product) I love the look. It's white with a pearlized sheen.
I didn't have a Honey ink pad, but I do have the reinker- not sure what the deal is there. So I dropped a drop of ink on a tissue, dabbed it off on a scrap and then circular rubbed it in on the embossed rose. I wanted the center of the flower darker and some of the edges. I did the inking before I cut the flowers out. There's only one stamp size of the rose so I created two and then cut one down when I had it colored the way I wanted it. I used the same tissue technique and used a little Autumn TerraCotta ink in the centers of the roses.
Seam Binding Z1732 and a bling brad z1360 pretty much finish it.
It was a little difficult for me not to do some ink distressing on the edges of the papers! I caught myself a couple of times getting ready to start inking, but the inspiration card didn't use any and I really liked everything about the card and so I reframed. It really gives a clean look without the distressing. So here it is....
 Enjoy Polly
I admit it, I'm addicted, but I have gone for days without looking too.
Anyway, back to this card-it was posted on stampinconnection.com which is a Stampin Up demonstrators community. And since I'm not a Stampin Up Demonstrator I can't log in and give credit where credit is due. So I copied it the best I could using Close To My Heart products.
Pemberly paper pack.
Stamp sets: the sentiment Simple Beauty D1261 (retired)
Rosy Regards DB1369
Card Word Puzzle C1494
I created the roses by first embossing on white cardstock the rose from Card Word Puzzle. I used Silver Pearl Z678 embossing powder (no longer available through Close To My Heart, but it's a Ranger product) I love the look. It's white with a pearlized sheen.
I didn't have a Honey ink pad, but I do have the reinker- not sure what the deal is there. So I dropped a drop of ink on a tissue, dabbed it off on a scrap and then circular rubbed it in on the embossed rose. I wanted the center of the flower darker and some of the edges. I did the inking before I cut the flowers out. There's only one stamp size of the rose so I created two and then cut one down when I had it colored the way I wanted it. I used the same tissue technique and used a little Autumn TerraCotta ink in the centers of the roses.
Seam Binding Z1732 and a bling brad z1360 pretty much finish it.
It was a little difficult for me not to do some ink distressing on the edges of the papers! I caught myself a couple of times getting ready to start inking, but the inspiration card didn't use any and I really liked everything about the card and so I reframed. It really gives a clean look without the distressing. So here it is....
Another card for the Heart 2 Heart challenge for this week

Heart 2 Heart challenge - Mother's Day card
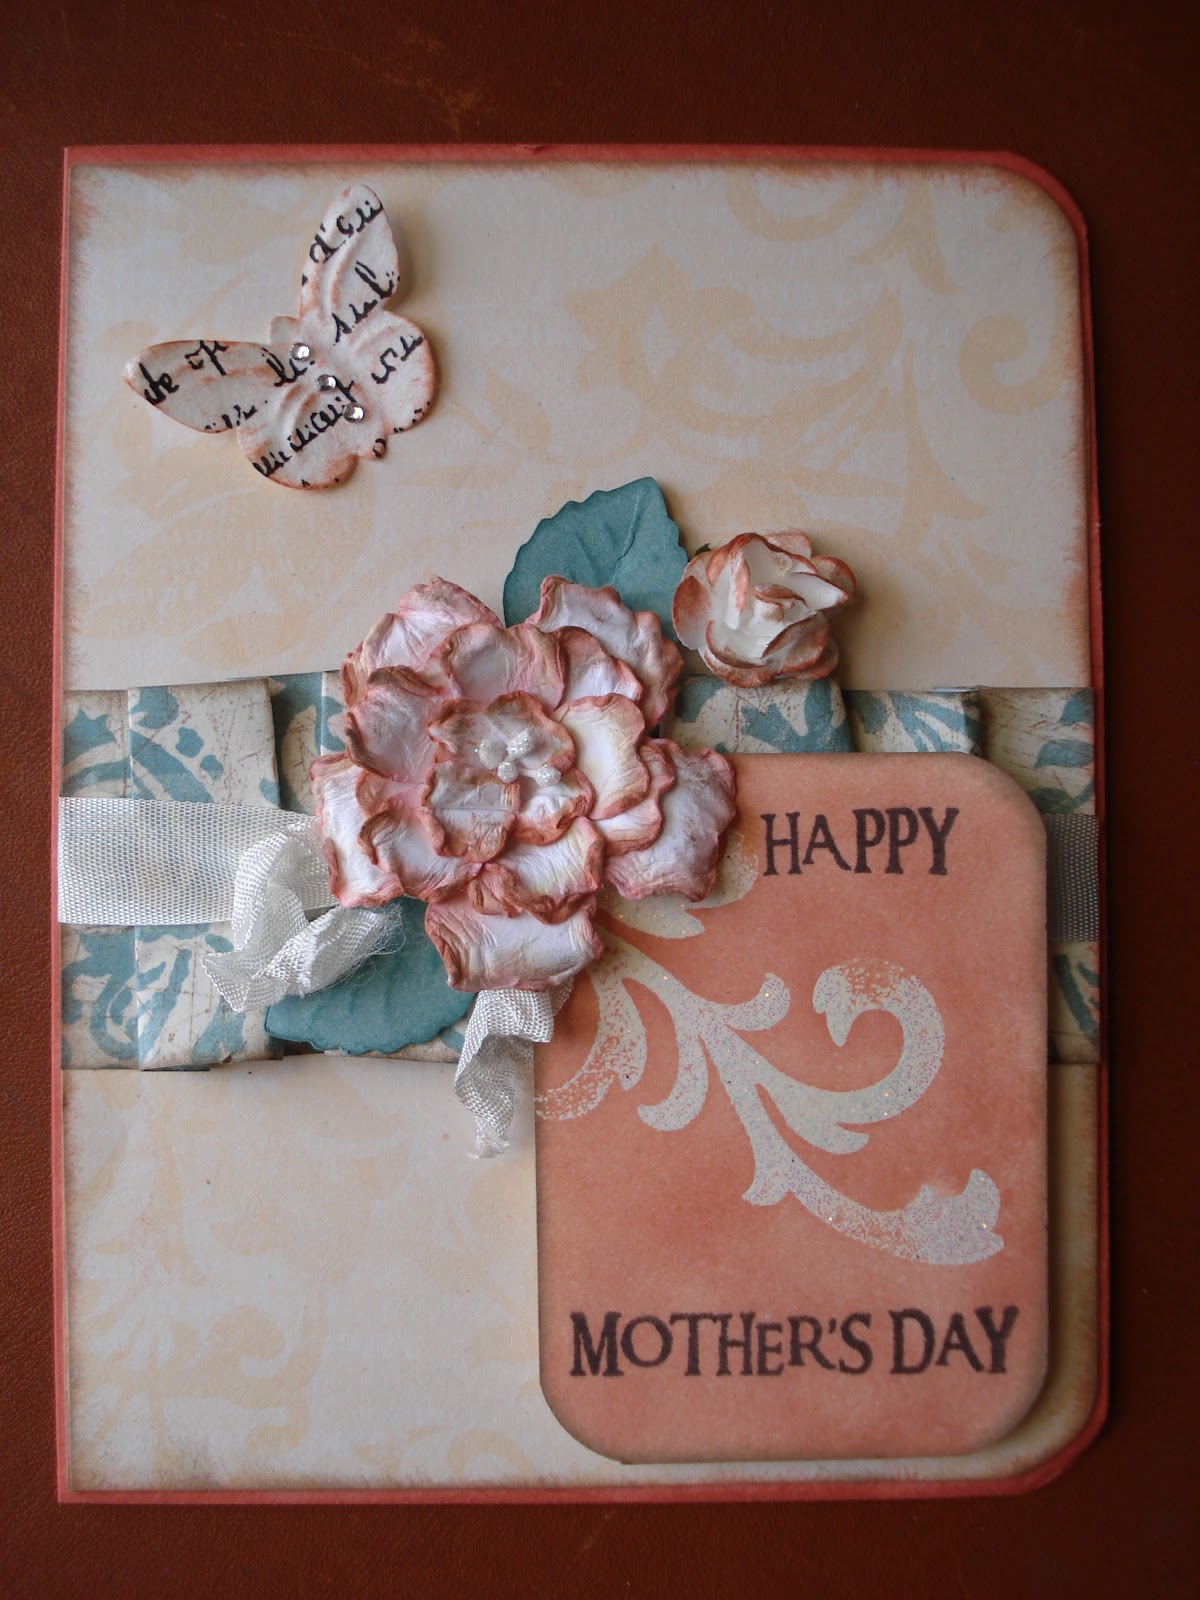
Heart 2 Heart challenges has a very appropriate challenge for this week. Let's remember our Mothers and all that they mean to us and all that they do or have done for us. We'd be in a very bad way if we didn't have mothers in our lives, in many aspects. I am blessed to have my mother and mother-in-law still living and they've both played big roles in my life. I don't do enough to show my appreciation for them.
I made this first card and used it for two card classes that I had recently. I have had a lot of fun making these Prima-look-alike flowers and wanted to teach my crafty ladies how to create them too. Here is where I got my inspiration for them. http://simplypaperandcreativity.blogspot.com/2011/06/wild-roses-tutorial.html she has several different flower tuts. I am sooo in love with these flowers. They become hard after misting with water and creating the scrunched, pinched leaves and drying and so aren't easily crushed, can be made with cardstock and/or patterned paper. I haven't tried the lighter weight paper. The patterned paper I used was double sided cardstock weight paper. You can ink them, glimmer mist them and more. Best of all they can be cut using a flower shape in the Art Philosophy cricut cartridge!
I used some older Close To My Heart papers:Perfect Day and Veranda
The leaves were cut from the Art Philosophy cart also. I textured them using a stylus and a mouse pad and then inked them.
I made the flourish using VersaMark and clear embossing powder with some glitter mixed in with it.
I started out with a rectangle of Colonial White cs. I rounded the edges, stamped and heat embossed the flourish and then inked over it all using Sorbet ink and a sponge dabber. Then stamped the sentiment.
 here are a couple of close ups:
 Entering this in the Anything Goes challenge #66 Wings and Things and also
Frosted Designs Fabulous Friday challenge. It's a recipe challenge.
I used ribbon, glitter, butterfly and flower. Hope you enjoy! Polly
I made this first card and used it for two card classes that I had recently. I have had a lot of fun making these Prima-look-alike flowers and wanted to teach my crafty ladies how to create them too. Here is where I got my inspiration for them. http://simplypaperandcreativity.blogspot.com/2011/06/wild-roses-tutorial.html she has several different flower tuts. I am sooo in love with these flowers. They become hard after misting with water and creating the scrunched, pinched leaves and drying and so aren't easily crushed, can be made with cardstock and/or patterned paper. I haven't tried the lighter weight paper. The patterned paper I used was double sided cardstock weight paper. You can ink them, glimmer mist them and more. Best of all they can be cut using a flower shape in the Art Philosophy cricut cartridge!
I used some older Close To My Heart papers:Perfect Day and Veranda
The leaves were cut from the Art Philosophy cart also. I textured them using a stylus and a mouse pad and then inked them.
I made the flourish using VersaMark and clear embossing powder with some glitter mixed in with it.
I started out with a rectangle of Colonial White cs. I rounded the edges, stamped and heat embossed the flourish and then inked over it all using Sorbet ink and a sponge dabber. Then stamped the sentiment.

Frosted Designs Fabulous Friday challenge. It's a recipe challenge.
I used ribbon, glitter, butterfly and flower. Hope you enjoy! Polly
Monday, May 7, 2012
Hello!?.....I'm back.....
First off, to those who may have been wondering if I dropped off the edge of the earth, I apologize, life has just been happening in a big way here. Partly due to being gone for 6 weeks this summer, I think that some of the things that didn't get done while I was gone have just now been catching up to me. Things like bookwork and then getting the tax paperwork done and ready to send off. This is exactly one of the reason that I procrastinated in even starting a blog, but that's not really a good enough reason not to start a blog.
Adding another person back into your household adds more work than I anticipated and of course somewhat changes some of your routines. Our oldest son moved back here to Texas from Indiana. I am totally thrilled with that and am not complaining, just stating facts. I do more cooking and more laundry and more "hey Mom, can you do............" He is dating a girl down here and we are thrilled with that and know that his being here in our home will only be a temporary thing. He will soon be 23 and he's been on his own for about 5 years previous to this move.
One of those classes is a sewing class for the ladies at our church. Most are beginners so we started with a beginner pillow. We did a lapped back and the flower on the front gave them a chance to work with ruffles.
Here is the sample I made. Everyone else made theirs bigger, but I already had this pillow form. I also want to make several pillows in several sizes and put them together on a bed.
 This is just a 12" pillow. I used Toile Decorator fabric for the base and then muslin for my ruffled flower. And old button finishes the center.
Adding another person back into your household adds more work than I anticipated and of course somewhat changes some of your routines. Our oldest son moved back here to Texas from Indiana. I am totally thrilled with that and am not complaining, just stating facts. I do more cooking and more laundry and more "hey Mom, can you do............" He is dating a girl down here and we are thrilled with that and know that his being here in our home will only be a temporary thing. He will soon be 23 and he's been on his own for about 5 years previous to this move.
One of those classes is a sewing class for the ladies at our church. Most are beginners so we started with a beginner pillow. We did a lapped back and the flower on the front gave them a chance to work with ruffles.
Here is the sample I made. Everyone else made theirs bigger, but I already had this pillow form. I also want to make several pillows in several sizes and put them together on a bed.

Thursday, March 29, 2012
New from Close To My Heart!
For those of you who have ordered from me through my Close To My Heart website, it is no longer around. CTMH has provided us with a brand new website! It is easier to navigate and has a lot of new features. You will see my contact information including my blog and FB page (which I hope to open soon). I will now only have to load my classes, my creations and all other info on my blog instead of two or three places. You can see the Idea Book there and it is much more viewable. The first tab at the top is SHOP, click on that and there are lots of options, but I want to point out that the bottom selection is "While Supplies Last" you can get some super deals here. Another tab PROJECT INSPIRATION features CTMH TV which are short videos showing techniques, ideas and how to use our products. This also has the Workshop On The Go projects, the bonus projects and more. PROMOTIONS tab shows the currant promotions like Constant Campaigns and Stamp of the Month. Also, when you are on the home page, there is a moving marquee featuring the newest things that have been added such as videos and such.
Shipping is cheaper than it used to be. It is the same as when you place an order directly with me. When you order from the website the order will go directly to you.
Another new item, we've been provided with a monthly newsletter! Most of the content will be written by Close To My Heart, but we will have limited space to add our own news. All my contact info will be there and I will be directing you to my blog to get further information on classes and such.
Friday, March 16, 2012
Feminine card and new technique I tried
As I said before, I have a bunch of birthdays in March, so here is another card. This one for a friend of mine. I used Frosted Designs card sketch #14 for this card. And The Shabby Tea Room is celebrating its second birthday this week with lots of prizes and inspiration going on. Go on over there and check it all out. Their weekly challenge "Spring Is Near" has a photo for inspiration. We need to use three of the colors in the photo and dry embossing. We were to use our imaginations for the dry embossing and I remembered I'd just seen someone showing how to emboss using acrylic packaging. I'm sorry I don't recall where I saw it and so I can't give credit where its due. I used a piece of acrylic packaging and ran it through Sizzex Texture Boutique. Then I cut my flower shape using my Cricut and the Art Philosophy cartridge. Next I swiped Stazon Timber Brown ink over the flowers. I cut three sizes. 1 1/2", 1", and 3/4". Then I heated with craft heater to shape and dry the ink. You need to be very careful here. It doesn't take much heat to soften enough to bend the petals. To much heat melts the texture right out. I know! But, it was fun and easy to do and I really like how they look. Another great way to reuse and recycle!
I cut my circle card shape, the little flowers, and the sentiment label using the same Cricut cartridge. The seam binding I dyed to match the Sweet Leaf cardstock strip that I laced through a Color Ready Self Adhesive Border from CTMH. The paper is an old paper pack: Notebook. The card base is Desert Sand cardstock and I used D1477 Universal Backgrounds stamp set to get the woodgrain texture. The ink is Desert Sand for a tone on tone look. Here is the sketch:


I cut my circle card shape, the little flowers, and the sentiment label using the same Cricut cartridge. The seam binding I dyed to match the Sweet Leaf cardstock strip that I laced through a Color Ready Self Adhesive Border from CTMH. The paper is an old paper pack: Notebook. The card base is Desert Sand cardstock and I used D1477 Universal Backgrounds stamp set to get the woodgrain texture. The ink is Desert Sand for a tone on tone look. Here is the sketch:
And here is my creation-

An inside peek-

And a close-up of the acrylic flower-

I will definitely be using this technique more.
Have a blessed day. Polly
Thursday, March 15, 2012
Lucky to have you in my life Challenge
Not sure what happened with my last post. I said I entered it into 2 challenges, one being the weekly Heart2Heart challenge, but on checking back later in the week, I discovered that I hadn't added it to either of the places that I should have. I thought I remembered doing that, but I guess not. Maybe being busy getting ready to go out of town and age have something to do with that! Haha. It's quite a process to do everything that needs done to get a post ready. Make the project, take pictures of the project, upload pictures to computer, take them into photo program and do whatever you gotta do to them (which I don't know a whole lot about), save them, then go create your post and get everything in it, then go link it to whatever your wanting to link it to. That leaves quite a lot of areas where you could leave something out, especially when your in a hurry. So I completed all the challenges at Heart 2 Heart in February, but you won't see that over there.
Heart 2 Heart's challenge this week is to make a card for someone you are lucky to have in your life and also to use the color green. March is a month full of birthdays of friends and family so I chose to make a card for one of them. Green is good for a masculine card, so that's what I chose to do. I am combining that with the Mojo Monday 232 card sketch challenge. Here is the sketch.


Heart 2 Heart's challenge this week is to make a card for someone you are lucky to have in your life and also to use the color green. March is a month full of birthdays of friends and family so I chose to make a card for one of them. Green is good for a masculine card, so that's what I chose to do. I am combining that with the Mojo Monday 232 card sketch challenge. Here is the sketch.
And here is my card. I used patterned paper from Close To My Heart's Stella and a small piece from an old paper pack called Rustic Trail. I used CTMH's ink colors: Bamboo, Desert Sand, Olive, and Stazon Black. I used a stipple brush for the background and used 3 of the ink colors mentioned. Most of the stamp sets were retired stamp sets. I used our twill for the ribbon.

And the inside:

Now off to create more birthday cards.
Blessings, Polly
Subscribe to:
Posts (Atom)